

We saw what an XDP program is in part one: it can be used to mitigate distributed denial-of-service (DDoS) attacks.
In this part, I will show you how to create an XDP program that mitigates SYN flood attacks. We’ll do that with the Rust Aya framework.
Follow the guide!
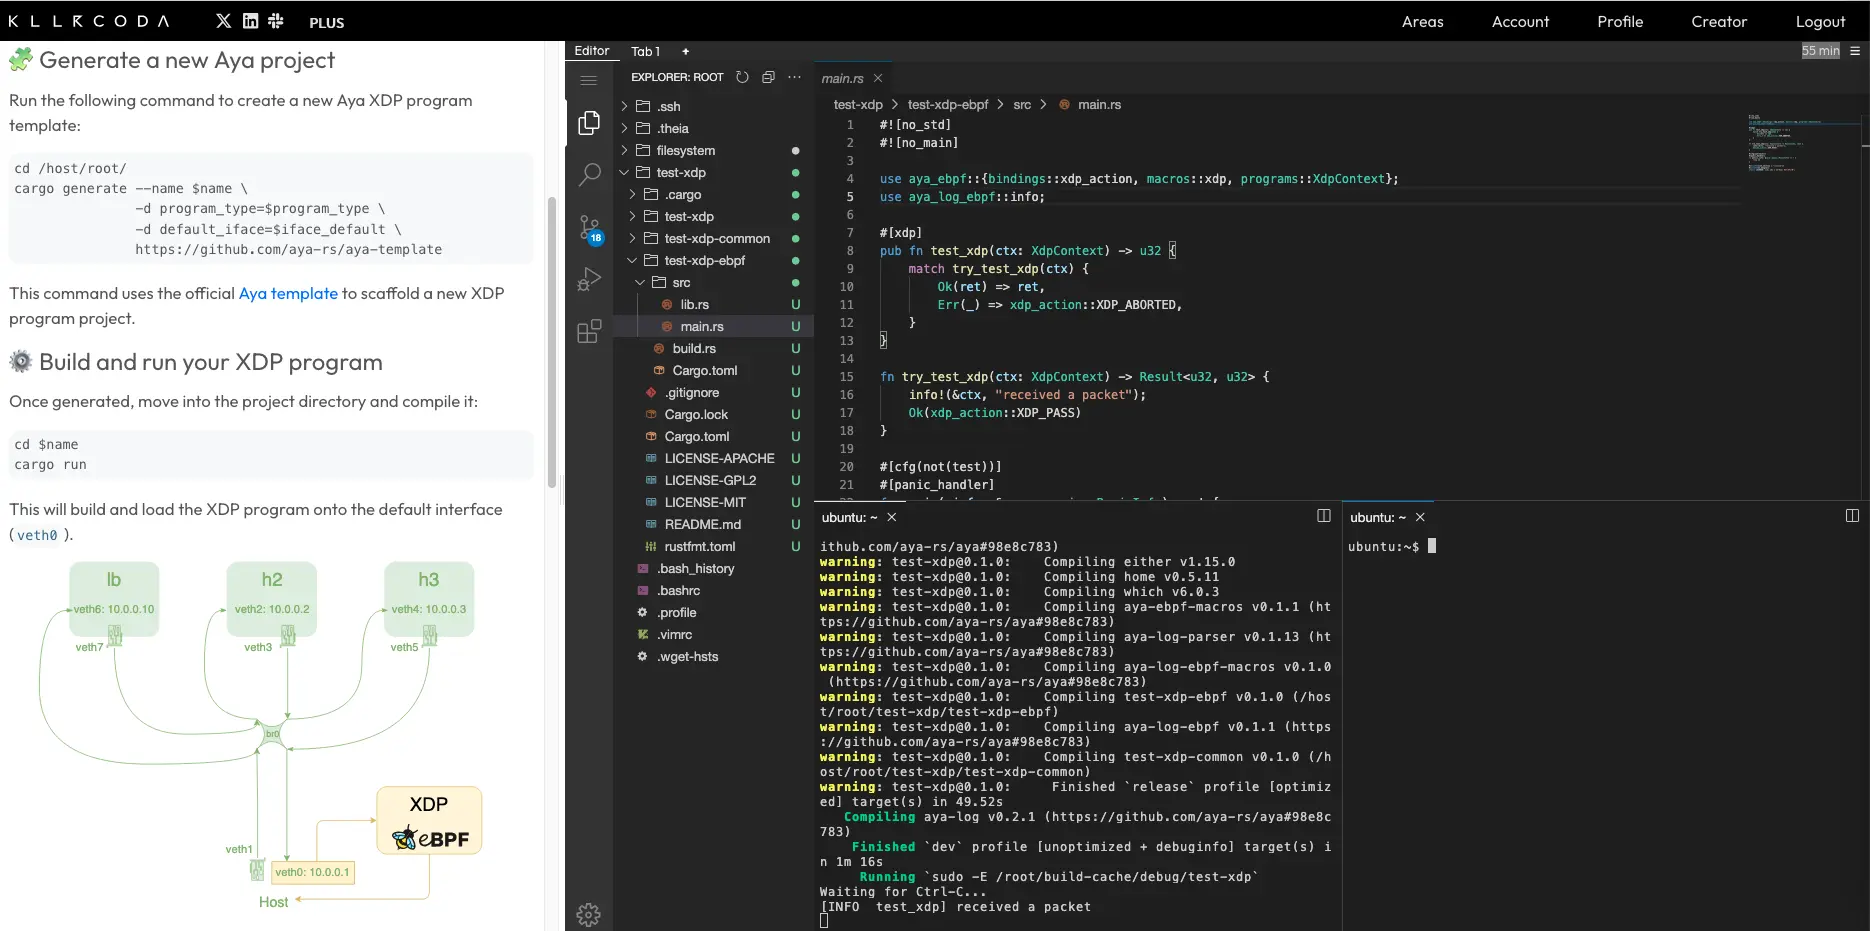
I assume you are already in an environment for developing with Aya. If not, you can use the Killercoda lab:
Let’s create a little tcpdump with XDP#
Before doing that, we will first explain how to analyze a TCP segment with XDP and thus retrieve SYN packets. By the way, do you remember how TCP works?
TCP connections#
TCP stands for Transmission Control Protocol. It is probably the most widely used network protocol by application protocols such as HTTP, SSH, etc. It is difficult to ignore in articles about networks. However, it is probably the most complex when compared to UDP or ICMP.
Before downloading useful data, there is a connection phase (3-way handshake) to establish a reliable channel.
What is SYN Flood?#
SYN is the first TCP segment used to initiate a TCP connection. When a server receives a SYN, it must send back a SYN-ACK to acknowledge receipt. Once this is done, the client must confirm with an ACK and the data download can finally take place.
Suppose a client sends a SYN connection but never responds. What happens?
- The server sends a SYN-ACK in response and then retries 5 times (default value).
- The server finally closes the incomplete connection
Suppose a client floods the server with lots of SYN connections but never responds. What happens?
- The server then keeps a lot of connections “pending” (some of which are probably legitimate)
- The server continues to send SYN-ACK until its memory resources are saturated
That’s the principle behind a SYN Flood attack.
In this article, to counter this attack, we will count the number of SYN per IP and if there are too many, we will temporarily block these segments for that IP.
How to view segment details#
If you haven’t already done so, let’s recreate the development environment:
git clone https://github.com/littlejo/eunomia.dev
cd eunomia.dev/docs/tutorials/42-xdp-loadbalancer/
./setup.sh

Let’s start a small web server at the lb namespace level:
ip netns exec lb python3 -m http.server 8080
- On the
veth6interface, we will see the TCP packets sent by the client (such as SYN); - On the
veth7interface, we will see the TCP packets sent by the server (such as SYN-ACK).
We therefore need to install the eBPF program on veth6.

Let’s generate the Aya program:
cargo generate --name antiddos-xdp \
               -d program_type=xdp \
               -d default_iface=veth6 \
               https://github.com/aya-rs/aya-template
cd antiddos-xdp
In anticipation, we will use additional crates:
- aya-ebpf-bindings for additional eBPF bindings
- network-types for Rust structures of level 1, 2, and 3 headers
- blog-xdp, the crate from this blog, so we don’t have to copy/paste previously written helper functions
So we’re going to modify the antiddos-xdp-ebpf/Cargo.toml file and add the following to the dependencies section:
aya-ebpf-bindings = "0.1.1"
network-types = "0.1.0"
blog-xdp = { git = "https://github.com/littlejo/blog-xdp" }
Let’s check that the generated program works properly:
First, we’ll build the binary:
cargo build
Then we’ll install it in the target namespace where the veth6 interface is located:
ip netns exec lb cargo run
Now we will retrieve only TCP packets in the eBPF program. We will modify the antiddos-xdp-ebpf/src/main.rs file.
We end up with code similar to the code in the previous section:
use network_types::{
    eth::{EthHdr, EtherType},
    ip::{Ipv4Hdr, IpProto},
    tcp::TcpHdr,
};

use blog_xdp::helper::ptr_at;

fn try_antiddos_xdp(ctx: XdpContext) -> Result<u32, u32> {
    let ethhdr: *const EthHdr = ptr_at(&ctx, 0)?;

    match unsafe { (*ethhdr).ether_type() } {
            Ok(EtherType::Ipv4) => {}
            _ => return Ok(xdp_action::XDP_PASS),
        }

    let ipv4hdr: *const Ipv4Hdr = ptr_at(&ctx, EthHdr::LEN)? ;

    match unsafe { (*ipv4hdr).proto } {
         IpProto::Tcp => {}
         _ => return Ok(xdp_action::XDP_PASS),
    }

    let tcphdr: *const TcpHdr = ptr_at(&ctx, EthHdr::LEN + Ipv4Hdr::LEN)? ;
    let src_addr = unsafe { (*ipv4hdr).src_addr };
    let dst_addr = unsafe { (*ipv4hdr).dst_addr };

    info!(&ctx, "src:{:i} => dst:{:i}", src_addr, dst_addr);
    Ok(xdp_action::XDP_PASS)
}
We can test that it works:
ip netns exec lb cargo run
Then, use the following command to test the XDP program:
curl 10.0.0.10:8080
In the Cargo output, we can see several packets passing through:
[INFO  antiddos_xdp] src:10.0.0.1 => dst:10.0.0.10
[INFO  antiddos_xdp] src:10.0.0.1 => dst:10.0.0.10
[INFO  antiddos_xdp] src:10.0.0.1 => dst:10.0.0.10
[INFO  antiddos_xdp] src:10.0.0.1 => dst:10.0.0.10
[INFO  antiddos_xdp] src:10.0.0.1 => dst:10.0.0.10
[INFO  antiddos_xdp] src:10.0.0.1 => dst:10.0.0.10
As I explained at the beginning, when we launch a TCP connection, there is not just one packet but several packets.
We only see the packets sent by the client (those marked ingress).

If we want to see the packets sent by the server, we need to install the program on the veth7 interface. It’s very simple, just override the iface variable:
cargo run -- --iface veth7

To display a little more detail about the nature of the packets, let’s now look at the TCP segment header:

For purists, the diagram is somewhat simplified.
Let’s take a quick look at what the main data is used for:
- SRC/DST PORT: TCP ports
- SEQUENCE/ACK NUMBER: for connection tracking
- BITFIELD: this is where we define the nature of the segment (SYN, ACK, etc.)
- WINDOW: for flow control (useful for big files)
- CHECKSUM: for segment integrity
As with UDP, we can easily retrieve the elements by looking at the crate documentation network-types:
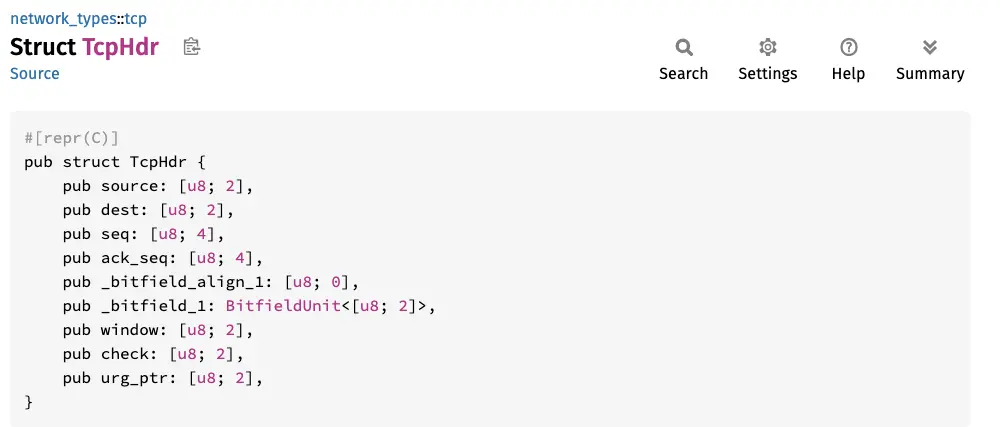
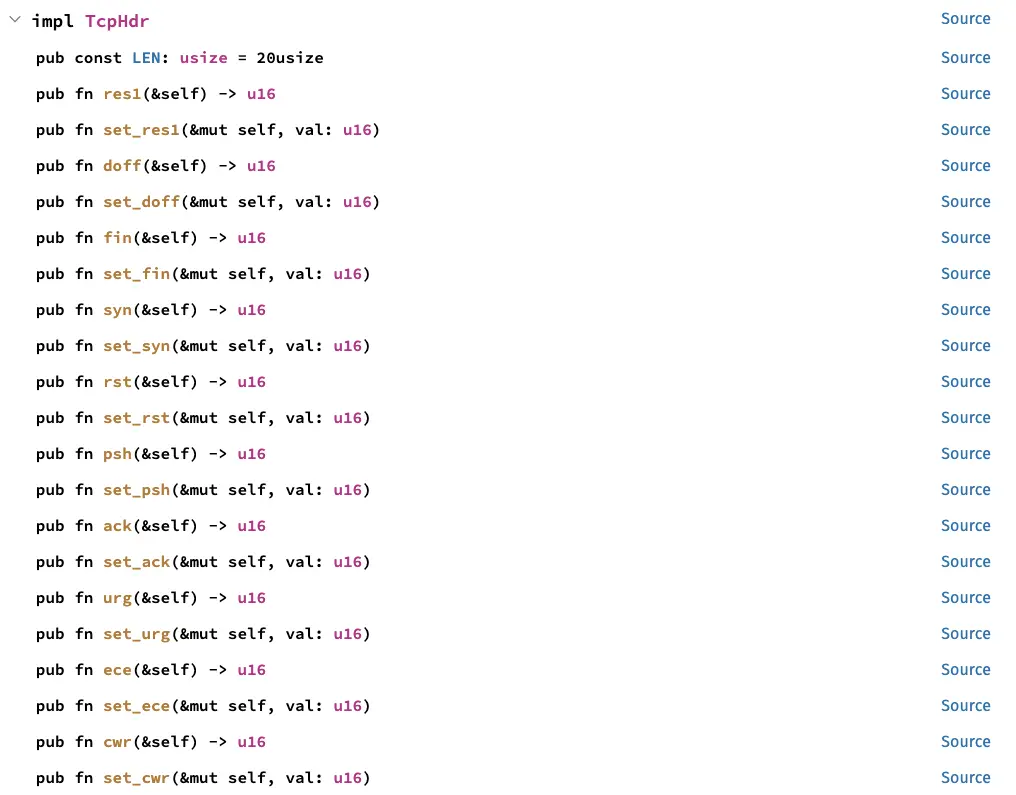
To retrieve the nature of the segment, there are even functions to help us:
let src_port = u16::from_be_bytes(unsafe { (*tcphdr).source });
let dst_port = u16::from_be_bytes(unsafe { (*tcphdr).dest });
let seq = u32::from_be_bytes(unsafe {(*tcphdr).seq});
let ack_seq = u32::from_be_bytes(unsafe {(*tcphdr).ack_seq});
let syn = unsafe {(*tcphdr).syn()};
let ack = unsafe {(*tcphdr).ack()};
let psh = unsafe {(*tcphdr).psh()};
let fin = unsafe {(*tcphdr).fin()};

info!(&ctx, "seq: {}, ack_seq: {}, syn: {}, ack: {}, data: {}, fin: {}, src: {:i}:{}, dst: {:i}:{}",
                 seq, ack_seq, syn, ack, psh, fin, src_addr, src_port, dst_addr, dst_port);
Let’s install this program on both network interfaces:
ip netns exec lb cargo run
cargo run -- --iface veth7
Let’s launch a connection:
curl 10.0.0.10:8080
At the veth6 interface, we can then see the details of the different segments:
[INFO  antiddos_xdp] seq: 2481734691, ack_seq: 0, syn: 1, ack: 0, data: 0, fin: 0, src: 10.0.0.1:47632, dst: 10.0.0.10:8080
[INFO  antiddos_xdp] seq: 2481734692, ack_seq: 161636304, syn: 0, ack: 1, data: 0, fin: 0, src: 10.0.0.1:47632, dst: 10.0.0.10:8080
[INFO  antiddos_xdp] seq: 2481734692, ack_seq: 161636304, syn: 0, ack: 1, data: 1, fin: 0, src: 10.0.0.1:47632, dst: 10.0.0.10:8080
[INFO  antiddos_xdp] seq: 2481734769, ack_seq: 161636460, syn: 0, ack: 1, data: 0, fin: 0, src: 10.0.0.1:47632, dst: 10.0.0.10:8080
[INFO  antiddos_xdp] seq: 2481734769, ack_seq: 161637894, syn: 0, ack: 1, data: 0, fin: 0, src: 10.0.0.1:47632, dst: 10.0.0.10:8080
[INFO  antiddos_xdp] seq: 2481734769, ack_seq: 161637894, syn: 0, ack: 1, data: 0, fin: 1, src: 10.0.0.1:47632, dst: 10.0.0.10:8080
[INFO  antiddos_xdp] seq: 2481734770, ack_seq: 161637895, syn: 0, ack: 1, data: 0, fin: 0, src: 10.0.0.1:47632, dst: 10.0.0.10:8080
At the veth7 interface:
[INFO  antiddos_xdp] seq: 161636303, ack_seq: 2481734692, syn: 1, ack: 1, data: 0, fin: 0, src: 10.0.0.10:8080, dst: 10.0.0.1:47632,
[INFO  antiddos_xdp] seq: 161636304, ack_seq: 2481734769, syn: 0, ack: 1, data: 0, fin: 0, src: 10.0.0.10:8080, dst: 10.0.0.1:47632,
[INFO  antiddos_xdp] seq: 161636304, ack_seq: 2481734769, syn: 0, ack: 1, data: 1, fin: 0, src: 10.0.0.10:8080, dst: 10.0.0.1:47632,
[INFO  antiddos_xdp] seq: 161636460, ack_seq: 2481734769, syn: 0, ack: 1, data: 1, fin: 0, src: 10.0.0.10:8080, dst: 10.0.0.1:47632,
[INFO  antiddos_xdp] seq: 161637894, ack_seq: 2481734769, syn: 0, ack: 1, data: 0, fin: 1, src: 10.0.0.10:8080, dst: 10.0.0.1:47632,
[INFO  antiddos_xdp] seq: 161637895, ack_seq: 2481734770, syn: 0, ack: 1, data: 0, fin: 0, src: 10.0.0.10:8080, dst: 10.0.0.1:47632,
Now that we have seen all the details of a TCP segment, we will now focus solely on SYN type segments:
match unsafe { (*tcphdr).syn() } {
     1 => {}
     _ => return Ok(xdp_action::XDP_PASS),
}
If we are dealing with a SYN, we continue processing; otherwise, we let the packet pass.
Since we will no longer be touching this part of the code, we will create a function:
#[inline(always)]
fn filter_tcp_syn_src(ctx: &XdpContext) -> Option<[u8; 4]> {
    let ethhdr: *const EthHdr = ptr_at(&ctx, 0).ok()?;

    match unsafe { (*ethhdr).ether_type() } {
            Ok(EtherType::Ipv4) => {}
            _ => return None,
        }

    let ipv4hdr: *const Ipv4Hdr = ptr_at(&ctx, EthHdr::LEN).ok()? ;

    match unsafe { (*ipv4hdr).proto } {
         IpProto::Tcp => {}
         _ => return None,
    }
    let tcphdr: *const TcpHdr = ptr_at(&ctx, EthHdr::LEN + Ipv4Hdr::LEN).ok()? ;

    match unsafe { (*tcphdr).syn() } {
       1 => {}
       _ => return None,
    }
    let src_addr = unsafe { (*ipv4hdr).src_addr };
    Some(src_addr)
}

fn try_antiddos_xdp(ctx: XdpContext) -> Result<u32, u32> {
    let src_addr = match filter_tcp_syn_src(&ctx) {
       Some(x) => x,
       None => return Ok(xdp_action::XDP_PASS),
    };
    info!(ctx, "{}", src_addr);
    Ok(xdp_action::XDP_PASS)
}
We only retrieve the source IP address from this function in order to potentially block it.
This will allow us to focus on the code to prevent the attack.
Let’s try mitigating SYN flood attacks#
Token Bucket#
There are various options for mitigating DDoS attacks. I’m going to talk about the token bucket algorithm (token bucket). It’s quite commonly
used as an algorithm (for example, nginx with limit_req).
To understand this algorithm, let’s use a little analogy:
A village imposes food restrictions:
- Each household must queue to obtain baskets.
- The village cannot store more than 5 baskets at a time per household.
- If the household has collected all its baskets, it must wait until the next day to get new ones.
- If the household has not collected any baskets for several days, it can collect several up to the limit of 5 baskets.
This method will thus limit abuse while remaining flexible by not requiring people to queue every day.
Applying this idea to protection against SYN Flood attacks, we get:
- Each IP must queue to send a SYN packet to a server.
- The server cannot receive more than 5 SYN packets at a time per IP.
- If the IP has already sent all its SYN packets, it will be temporarily blocked and will have to wait a while before it can send new ones
- If the IP has not sent any SYN packets for some time, it can send several up to the limit of 5.

That’s all well and good, but how do we actually do it in eBPF?
How do we implement it in eBPF?#
We are going to create an eBPF map: BUCKET {ip => TOKEN}. If the IP is not in BUCKET, it will be initialized to the maximum number (which is 5 in the analogy). Each time we receive a SYN, we decrease by 1. If the bucket is empty, we stop the packet.
For those who don’t know what an eBPF map is: to simplify, it can be seen as a persistent global variable in an eBPF program. Each time the XDP program is launched, it can access and modify this variable.
To learn more, I recommend reading the third part of my series Getting Started with eBPF with Aya.
The algorithm is not complete because all IPs would eventually be blocked, so tokens must be added. The intuitive solution would be to create a user program that regularly refills the eBPF map. But this is a bit risky if, for example, the program crashes.
One tip would be to create another eBPF map: LAST_TS: {ip => ts}. It contains the time when the BUCKET was last filled. Thus, in the eBPF program, we can
calculate the time that has elapsed and possibly catch up by adding tokens. Suppose we are supposed to give one token per second. If the last fill
was 5 seconds ago, we add 5 tokens within the bucket size limit.
{ip => {num => token, last_fill => ts }. But I find it simpler to separate it into two maps.Back to coding#
Decrementing the Bucket Map#
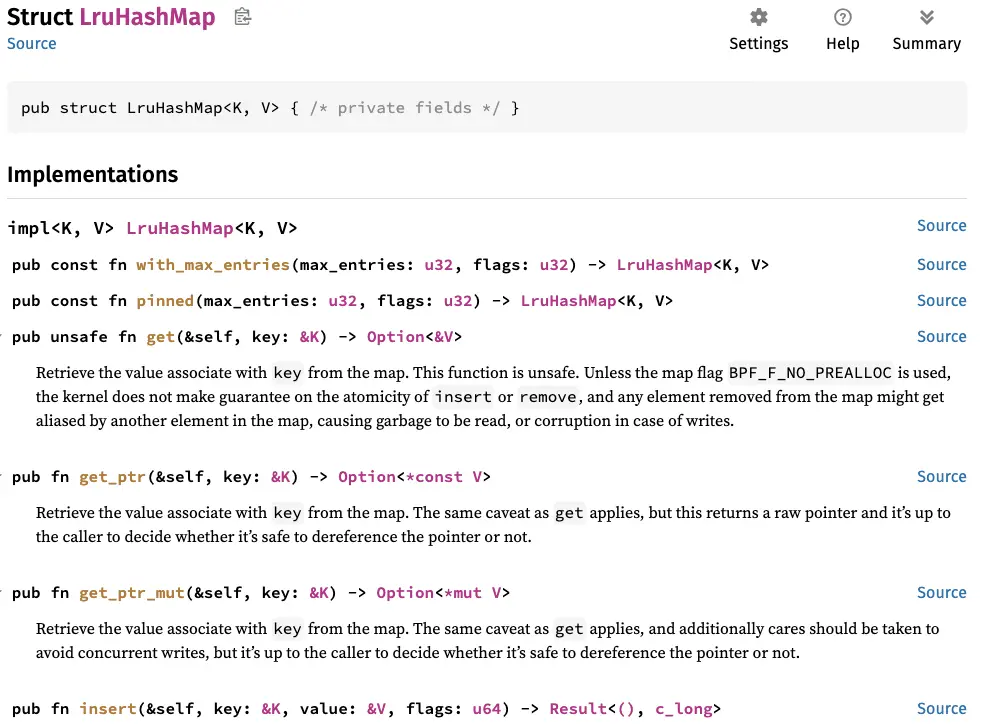
First, we will create the map that contains the tokens, using a map of type BPF_MAP_TYPE_LRU_HASH:
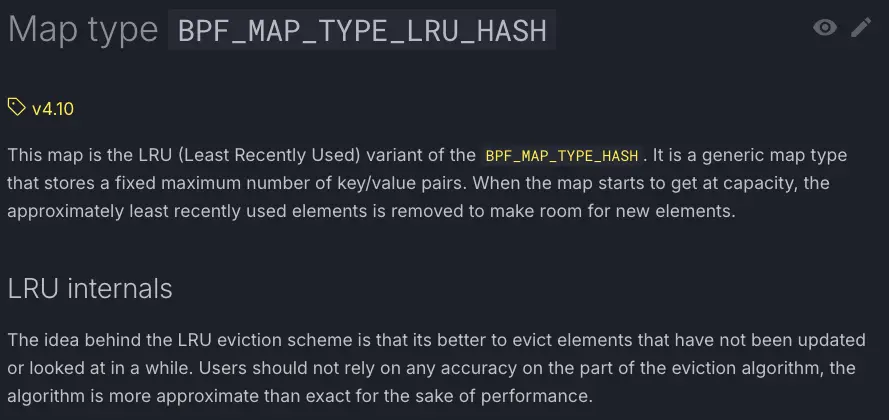
It automatically cleans up entries in case of overflow, limiting the number of IPs to 16:
use aya_ebpf::macros::map;
use aya_ebpf::maps::LruHashMap;

#[map]
pub static BUCKET: LruHashMap<[u8; 4], u64> = LruHashMap::with_max_entries(16, 0);
To find the number of tokens in the bucket, we will check if the map already contains this IP:
let token = match unsafe { BUCKET.get(&src_addr)} {
    Some(x) => *x,
    None    => 5, //Token max
};
The bucket cannot contain more than 5 tokens. We will create a constant at the end.
We will subtract 1 from the number of tokens and fill the map:
let token_final = token.saturating_sub(1);
let _ = BUCKET.insert(&source_addr, &token_final, 0);
saturating_sub is a Rust core method. It prevents the number of tokens from being negative. For a natural number, that would be strange.If the number of tokens is zero, we block the packet:
if token_final == 0 {
    info!(&ctx, "drop");
    return Ok(xdp_action::XDP_DROP);
}
Otherwise, we display the number of tokens:
info!(&ctx, "received a packet, token {}", token_final);
To make sure everything’s covered, here’s the main code:
use aya_ebpf::{macros::map, maps::LruHashMap};

#[map]
pub static BUCKET: LruHashMap<[u8; 4], u64> = LruHashMap::with_max_entries(16, 0);

fn try_antiddos_xdp(ctx: XdpContext) -> Result<u32, u32> {
    let src_addr = match filter_tcp_syn_src(&ctx) {
       Some(x) => x,
       None => return Ok(xdp_action::XDP_PASS),
    };

    let token = match unsafe { BUCKET.get(&src_addr)} {
        Some(x) => *x,
        None    => 5, //Token max
    };

    let token_final = token.saturating_sub(1);
    let _ = BUCKET.insert(&src_addr, &token_final, 0);

    if token_final == 0 {
        info!(&ctx, "drop");
        return Ok(xdp_action::XDP_DROP);
    }

    info!(&ctx, "received a packet, token {}", token_final);
    Ok(xdp_action::XDP_PASS)
}
For more information about the map, feel free to read the doc:
Let’s check:
ip netns exec lb cargo run
Let’s run it 6 times:
curl 10.0.0.10:8080
On the cargo run terminal, we get the expected result:
[INFO  antiddos_xdp] received a packet, token 4
[INFO  antiddos_xdp] received a packet, token 3
[INFO  antiddos_xdp] received a packet, token 2
[INFO  antiddos_xdp] received a packet, token 1
[INFO  antiddos_xdp] drop
[INFO  antiddos_xdp] drop
[INFO  antiddos_xdp] drop
In the end, since curl cannot connect to the server, it must retransmit SYN.
Calculating token additions#
The current program can only empty the bucket and therefore ultimately block all flows. Now let’s move on to filling the bucket. To do this, we need another map LAST_TS which will contain, for each IP, the timestamp of the last fill:
Let’s create the map:
#[map]
static LAST_TS: LruHashMap<[u8; 4], u64> = LruHashMap::with_max_entries(16, 0);
Similar to the BUCKET map, we will retrieve the timestamp from the LAST_TS map:
let ts = match unsafe { LAST_TS.get(&source_addr)} {
    Some(x) => *x,
    None    => 0,
};
To force the creation of the entry in the map, I set a timestamp of zero if the entry does not exist.
Let’s calculate the number of tokens to add:
let t = unsafe {bpf_ktime_get_ns()};
let duration = t - ts;
let token_add = duration / 1_000_000_000 ;
The bpf_ktime_get_ns() function calculates the time since the system started:

Timestamps are expressed in nanoseconds. Here, we add 1 token per second elapsed.
If we need to add more, we update the map:
if token_add > 0 {
   let _ = LAST_TS.insert(&source_addr, &t, 0);
}
We calculate the total number of tokens in the bucket:
let token_final = min(token.saturating_sub(1) + token_add, 5);
Using the min function, we prevent the bucket from containing more than 5 tokens.
For debugging:
info!(&ctx, "token {}, duration {}, token_add {}", token_final, duration, token_add);
Refactoring the code into functions gives us:
use aya_ebpf_bindings::helpers::bpf_ktime_get_ns;
use core::cmp::min;

const TOKEN_BUCKET_SIZE: u64 = 5;
const REFILL_INTERVAL_NS: u64 = 1_000_000_000;

#[inline(always)]
fn refill_tokens(src_addr: &[u8; 4]) -> u64 {
    let ts = match unsafe { LAST_TS.get(src_addr)} {
        Some(x) => *x,
        None    => 0,
    };

    let t = unsafe {bpf_ktime_get_ns()};
    let duration = t - ts;
    let token_add = duration / REFILL_INTERVAL_NS ;

    if token_add > 0 {
       let _ = LAST_TS.insert(src_addr, &t, 0);
    }
    token_add
}

#[inline(always)]
fn consume_token(ctx: &XdpContext, src_addr: &[u8; 4]) -> u64 {
    let token = match unsafe { BUCKET.get(src_addr)} {
        Some(x) => *x,
        None    => TOKEN_BUCKET_SIZE,
    };

    let token_add = refill_tokens(src_addr);
    let token_final = min(token.saturating_sub(1) + token_add, TOKEN_BUCKET_SIZE);
    let _ = BUCKET.insert(src_addr, &token_final, 0);
    info!(ctx, "token {}, token_add {}", token_final, token_add);
    token_final
}

fn try_antiddos_xdp(ctx: XdpContext) -> Result<u32, u32> {
    let src_addr = match filter_tcp_syn_src(&ctx) {
       Some(x) => x,
       None => return Ok(xdp_action::XDP_PASS),
    };

    let token_final = consume_token(&ctx, &src_addr);

    if token_final == 0 {
        info!(&ctx, "drop");
        return Ok(xdp_action::XDP_DROP);
    }

    Ok(xdp_action::XDP_PASS)
}
Let’s test the code now:
ip netns exec lb cargo run
By running this curl command multiple times:
curl 10.0.0.10:8080
We get this kind of display:
[INFO  antiddos_xdp] token 5, token_add 456446
[INFO  antiddos_xdp] token 5, token_add 5
[INFO  antiddos_xdp] token 5, token_add 5
[INFO  antiddos_xdp] token 4, token_add 0
[INFO  antiddos_xdp] token 4, token_add 1
[INFO  antiddos_xdp] token 3, token_add 0
[INFO  antiddos_xdp] token 3, token_add 1
[INFO  antiddos_xdp] token 2, token_add 0
[INFO  antiddos_xdp] token 2, token_add 1
[INFO  antiddos_xdp] token 1, token_add 0
[INFO  antiddos_xdp] token 1, token_add 1
[INFO  antiddos_xdp] drop
[INFO  antiddos_xdp] token 1, token_add 1
[INFO  antiddos_xdp] token 5, token_add 11
The first time, we initialized to 0, so the duration is the timestamp. We need to add 456,446 tokens, but since the bucket can only contain 5 tokens, we have 5 tokens.
Program limitations#
If you test with tools such as hping that can randomly generate IPs, the program won’t be able to do much about it. These tools generate packets that are inconsistent, so it’s better to detect them and stop the packet.
For massive DDoS attacks, filtering with dynamic rules, like Cloudflare does, would be much more effective.
This episode is now over! We have seen the basics of TCP connections and ways to mitigate DDoS attacks.
So far, we have either observed or blocked the packet, but we have not yet seen how to modify the packet.
In the next episode, we will see this by creating a small XDP load balancer.